Home Processing of C-41 Color Negative Film
The common notion about C-41 (color negative) processing is that it’s too complicated and difficult to easily do at home. This couldn’t be further from the truth: it’s easy. If you can process black-and-white, you can do C-41. Here are step-by-step instructions to get you started.
I’m assuming you already know how to process black-and-white. If you don’t know how to process film at all, start with black-and-white, not color.
What you need
If you’re already processing black-and-white film, you have everything you need except the chemicals. You do not need an automatic processing machine. Those Jobo machines are expensive, and I don’t even see them for sale anywhere any more. You also do not need a darkroom, just load your film into the tank in a changing bag as with black-and-white.
The only thing to check is that your thermometer reads high enough for color processing. You need one that will read well above 100°F or 40°C. Some thermometers made for black-and-white processing at room temperature don’t read that high. You also don’t want one that only reads two-degree increments. I use this one and this one.
For chemicals, the easiest way to get started used to be the Tetenal C-41 Press Kit. All the chemicals you need are included, in powder form. It’s $32.50, makes one liter of each chemical, and will process 12 rolls. Unfortunately, the photo supply stores are no longer willing to ship it. B&H claims it was always supposed to be labeled as hazmat and they were shipping it before by mistake. If you’re in or near New York City you can pick it up in person at B&H or Adorama, but if not, you may find it difficult to get your hands on one. If you do, the kit may be branded as Jobo rather than Tetenal; it’s the same thing.
You can look for a Unicolor C-41 Development Kit ($33 at that link), which is pretty much the same thing. The Film Photography Project Store also has several C-41 kits they can ship you.
Kodak’s chemistry for small-tank development is called “Flexicolor SM” and has separate bleach and fixer. Good luck finding it.
You can use a stabilizing final rinse instead of the stabilizer in the Tetenal kit.
If you’re desperate, Freestyle Photo sells Tetenal liquid kits, and will ship them via ground with ORM-D restrictions, but they want $44.99 for a one-liter kit. They’ll also sell you a Unicolor powder kit, but they want $52.49 for it.
You will need three (or four, if using separate bleach and fixer) one-liter bottles to store the mixed chemicals. These are disappearing from B&H, but they still have a small selection. Fancy glass bottles are actually cheaper than plastic. Some people wash out and use plastic soda bottles or glass liquor bottles.
Timing needs to be more exact than with black-and-white, so don’t use an egg timer.
Mixing the chemicals
Color chemistry is more toxic than black-and-white, so be correspondingly careful. If you get any on your hands, wash them right away, and definitely don’t inhale the powder. “More toxic” is relative, though: the chemicals are not especially dangerous.
The powder kits include four packets of powdered chemistry. Like many black-and-white chemicals, the developer and blix need to be mixed with warm water, with 110°F or 43.5°C recommended. Stir the powdered developer into 800ml of warm water until it’s dissolved, then add water to bring it up to one liter and stir some more until it’s clear (it is colored, but you can see through it).
The two packets “Blix A” and “Blix B” get mixed together to make one liter of blix. Starting again with 800ml of warm water, first stir in Blix A until dissolved, then Blix B, then bring it up to a liter (it won’t take much more water, be careful not to add too much). This is the nasty stuff. It looks like prune juice and smells worse. You can’t see through it to tell if it’s fully dissolved, so stir it well to make sure. (Don’t close the container and shake it, though).
Commercial labs always use separate bleach and fix steps in C-41 processing, but the powder kit combines the two into one step. (You cannot mix the two blix packets separately to make two steps.)
Wash your mixing container after the blix (you won’t be tempted not to; it is quite ugly), then mix the relatively innocent-looking stabilizer powder into a liter of water. The result will be as clear as water. You can do this at room temperature.
With the liquid kits, the developer comes as four separate bottles of liquid concentrate. Start with 690ml of water (a temperature of about 49°C is recommended), then mix in 100ml each of part A, B, and C, in order, then 10ml of Starter. One advantage to liquid conentrates, though, is that you need not mix the whole liter at once: you can mix a smaller amount, maintaining the right proportions.
The liquid bleach, fixer, and stabilizer are straightforwardly mixed with water, either all at once or in small amounts.
The chemicals, once mixed, do not have a long shelf life—probably two weeks at most, and it’s best to use them even sooner.
Getting started
The C-41 process was designed to be easily and consistently done by operators with minimal training. It has two defining characteristics you should know:
-
Temperature is critical, more so than with black-and-white. However, you only have to maintain the target temperature for a few minutes, which is easy.
-
The developing times are always the same regardless of the type of film or chemistry you are using: 3:30 for manual-tank processing, or 3:15 if using an automatic constant-agitation processing machine.
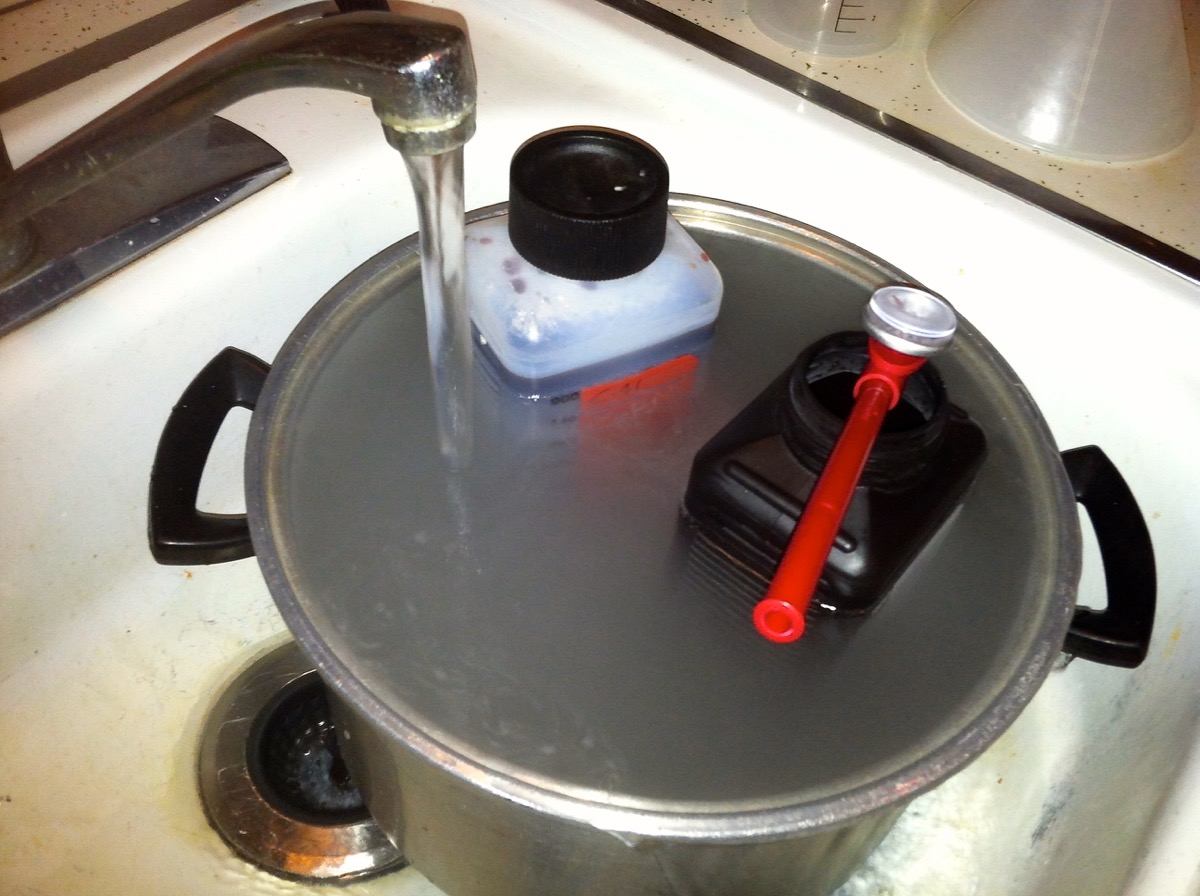
Put a large pot in your sink and fill it with hot water. Assuming you’re starting with chemicals at room temperature, the water should be almost hot enough to hurt your hand, but probably not the hottest your faucet can produce. (If your chemicals are already at temperature, because you just mixed them, the water should be closer to 102°F or 39°C.) Immerse your developer and blix bottles in the hot water, open the developer, and put your thermometer into it. Let the water keep running into the pot and overflowing out, so it won’t cool off. Stir occasionally while waiting so it warms evenly.
Your target developer temperature is 102°F or 39°C. This is not as hot as you would use to wash your hands (or to shave, if you’re a man); it is merely warm. As you approach 102°F, reduce the temperature of the water from the tap so it’s closer to the target temperature. If you take the water temperature and see how it feels on your hands, you will soon learn to do this pretty much by feel. If the water is too hot the chemicals will warm too quickly and you will overshoot the target temperature and need to cool it back down.
The Digibase liquid kit specifies 100°F rather than 102° for developing. That’s 37.8°C.
Meanwhile, you can pre-soak the film with warm water, near the developing temperature. This is optional, as with black-and-white, but if you don’t do it, put your developing tank into the hot water to warm it up or else it will cool off the developer too quickly. When you pour the pre-soak out of the tank it will be colored; this is normal.
Processing
When the developer hits 102°F or 39°F, you’re ready to start. You only need to maintain this temperature for three and a half minutes, so as long as your warm water bath is somewhere near that temperature you’ll be fine. However, you must be at 102°F, not 101 or 103. (If using the Digibase chemistry, 100°F is specified.) Note that all of the below times are listed on the instruction sheets that come with the chemistry kits; you needn’t print out this page for reference.
Step 1: Developer. Pour the developer into the tank, start your timer, and agitate exactly as you would with black-and-white. But don’t put the tank back down onto a cold counter, put it into the warm water bath to keep it at the right temperature. Agitate every 30 seconds, again just as with black-and-white, and when you reach 3:30, pour the developer back into the bottle. (It is not one-shot. One liter will do 12 rolls if you re-use it like this.) The instructions included with the Digibase chemistry specify 3:15 for the development step.
If you pour the developer into a graduate or other container to measure it out, warm the container in the warm water first so it doesn’t cool down the chemicals while measuring them.
Tetenal Step 2: Blix. Now pour in the blix. Temperature is less critical here; it is specified as 95°-105°F or 35°-40.5°C. Agitate exactly like you do with black-and-white, but again, returning the tank to the water bath between cycles. The blix stage goes for 6:30. Return the blix to the bottle when finished for re-use.
Digibase Step 2: Bleach and Fix. Pour in the bleach, using temperature and agitation as above, for 3:30. Return the bleach to its container, then pour in the fixer, with the same temperature and agitation, for 6:30. Return the fixer to its container for re-use.
Step 3: Wash. Now you can remove the top from the tank (the film is fixed). Wash the film under warm running water (95°-105°F or 35°-40.5°C) for at least 3 minutes.
Step 4: Stabilizer. Next comes the stabilizer. Fill the tank, agitate for 30 seconds, then let it sit for a minute, and return the stabilizer to the bottle.
At this point, your black-and-white instinct will be to wash the film for a good while, then soak it in Photo-Flo. You’re not supposed to do that: the stabilizer needs to stay. However, it does not contain a wetting agent like Photo-Flo, and you will get nasty drying marks on your film. The solution: add Photo-Flo to the stabilizer in the normal amount (1 teaspoon or 5ml for 1 liter).
Alternatives
If you can find Kodak’s Flexicolor Final Rinse, you can use that instead of stabilizer. You still don’t wash afterwards. The Flexicolor Final Rinse is supposed to be designed to reduce drying marks by itself; there is no harm in trying it, and if you don’t like the results, mix in Photo-Flo and go back and do the step again. You cannot use final rinse instead of stabilizer on pre-2002 (or so) film types.
Final rinse is difficult to completely wash; it is recommended to remove the film from the reel and do the final rinse step in a container other than your developing tank.
Washing film with water after stabilization, while not recommended, is something you can get away with. But you must not wash the film after a final rinse.
Congratulations
That’s it. You’re done. Dry the film, cut it up, and you’re ready to scan it (or print it, or whatever). That’s almost as easy as black-and-white, right?
If your negatives are brown instead of the expected orange, they haven’t been sufficiently bleached and fixed. Go back and re-do the blix process, then wash and stabilize again.